Directive Video Kit · start here
A little setting up.
Then your first cut.
This page covers the part your assistant cannot do for you: two programs to install, and getting the kit onto your laptop. Work through it in order. At the end you paste one message, and the kit runs the rest.
There are no accounts to open and no waiting periods. Do this before the session where you want to make the video, so that session is about the video and not about installing things.
01 Your assistant
One assistant does the work. You need one of two.
Claude Code, inside the Claude desktop app, is the recommendation, because the kit’s instructions describe its layout. Codex, inside the ChatGPT desktop app, works too and costs nothing to try.
If you already pay for one of them, use that one and carry on to the next section. If you do not, the assistants page has the download links, what each costs and the one extra thing Windows needs.
02 Two programs
No accounts. Two free installs, one of which is fiddly.
The kit renders the video on your own laptop, so the two programs that do that have to be there. Your assistant checks for both on the first run and tells you which is missing, so if you would rather not do this now, you can skip to the next section and let it walk you through.
Required · free · five minutes
Node.js
Node runs the kit: the checks, the rendering, the video template. Install the current LTS version from nodejs.org. On Windows, download the installer and click Next on every screen. On a Mac, the same, or brew install node if you use Homebrew. Then quit your assistant completely and open it again, so it can see the new install.
Required · free · ten minutes on Windows
FFmpeg
FFmpeg converts, measures and encodes video. The kit uses it on your recording and on the final file.
Windows. The short way is to open a terminal and run winget install Gyan.FFmpeg. The long way is to download the essentials build from gyan.dev/ffmpeg/builds, unzip it somewhere permanent such as C:\ffmpeg, and add its bin folder to your PATH. Either way, quit your assistant completely and open it again afterwards. If neither sentence means much to you, that is fine: your assistant can do this with you.
Mac. brew install ffmpeg in Terminal, if you have Homebrew. If you do not, install Homebrew first; it is one line from brew.sh.
Optional
Two things you may want later, and neither now
A voice on the video can be you, recorded on your phone, which needs nothing at all. A stock voice instead needs your own ElevenLabs account and key, and your assistant sets that up when you get there. Separately, if you want the kit to drive your web app and record it for you, it uses Google Chrome if you have it, and downloads a small browser of its own if you do not. And Tesseract, a free program that reads words out of pictures, lets the kit point at a real name or email in your recording and read what is drawn on the finished video; without it those checks say “not run”, and your assistant offers the one line that installs it.
Helpful, not required
Your material, roughly to hand
Your logo as an SVG or a PNG with a transparent background, your colours as hex codes if you have them, a demo or test account in your product with sample data rather than a real customer's, and an idea of the one thing the video should show, start to finish. No logo is fine: the product name set in type looks finished.
03 Get the kit onto your laptop
Two ways in. Both end in a folder you own.
Start from your library. The download path needs no GitHub account at all; the GitHub path gives you version history from the first minute. You can start with the download and add GitHub later, which the kit will offer to do for you.
Path A · simplest
Download the zip
- In your library, under Video Kit, click Download kit. It lands in your Downloads folder, as
directive-video-kit.zip. - Right-click the zip, choose Extract All, then open folders until you see a file called
AGENTS.md. That is the folder to open in your assistant. On a Mac, double-click the zip instead and the same folder appears beside it. - Move that folder somewhere permanent, such as Documents, and rename it after your product: lower case with hyphens, like
acme-crm. KeepAGENTS.mdsitting directly inside it. That is how your assistant knows what it is looking at.
Somewhere permanent matters more here than it does for a website: your recordings and every rendered version live in this folder, and they are what let you remake the video later.
Path B · if you know GitHub
Connect GitHub
- In your library, click Connect GitHub and type your GitHub username.
- GitHub emails you an invitation to the kit’s repository. Click the link and accept it.
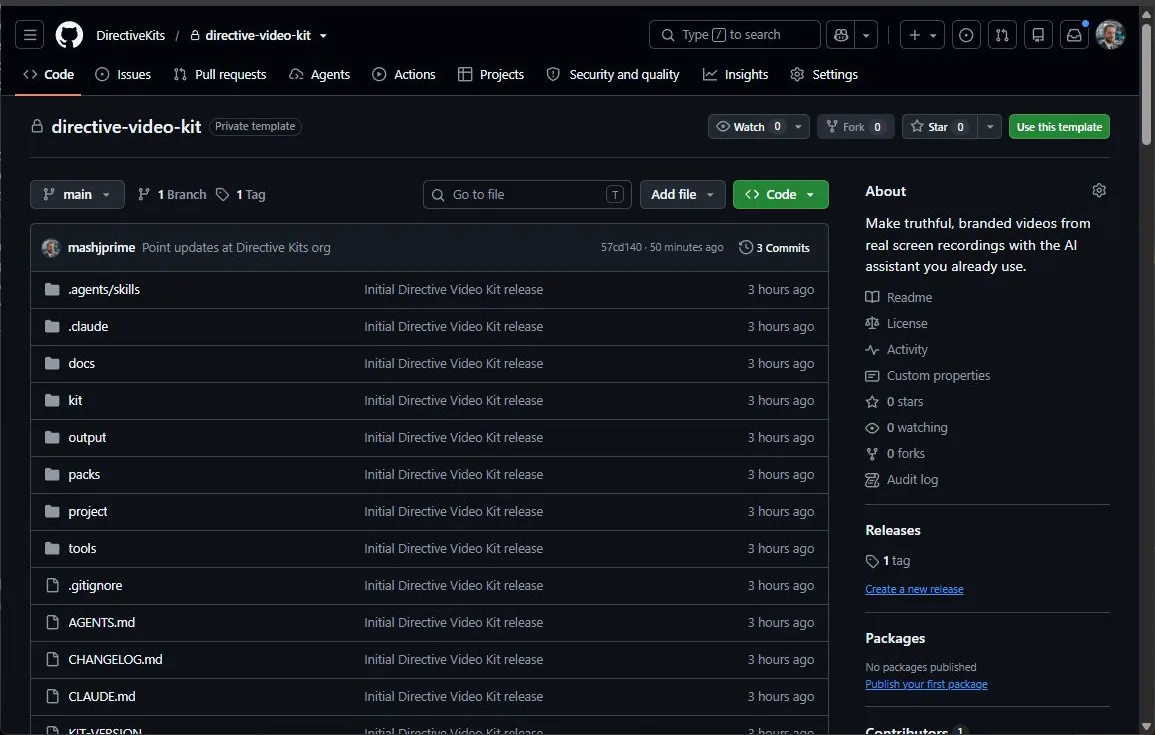
- On the repository page, click the green Use this template button. GitHub opens the page for creating your copy.
- Name it after your product, lower case with hyphens. Choose Private: the folder will hold your working notes and your own files. Leave the branches box unticked.
- Then get it onto your laptop, either by cloning it or with Code then Download ZIP. If you are not sure how to clone, take the address of your new repository and let your assistant do it in step 05.
Keep your copy private either way. Your footage will usually show more of your product, and more of your data, than you would publish.
04 Open the folder
Point your assistant at that folder.
In the Claude desktop app
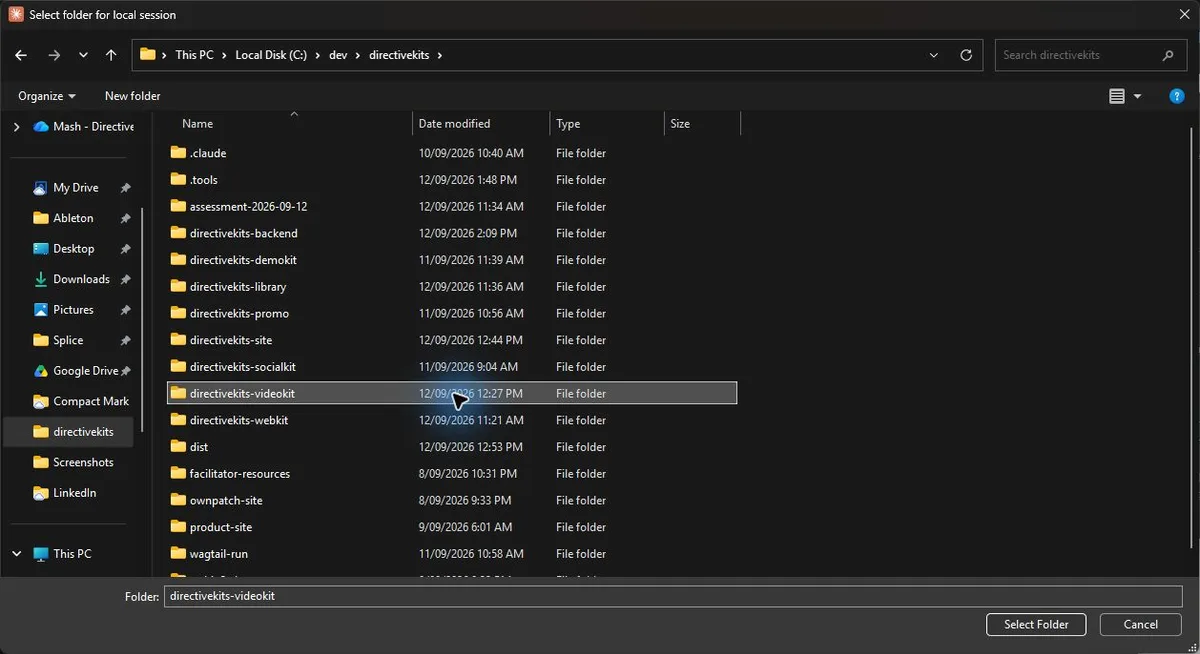
Open the app and click the Code tab. Click Local, then No folder, then Open folder…. Find the kit folder you just made and open it. If it asks whether you trust the folder, say yes: it is your folder, and you put it there.
In the ChatGPT desktop app
Open the app and switch to Codex. Under Projects, use the folder button to add a local project and choose the kit folder you just made. Open that project, start a chat and keep Local selected. If it asks whether you trust the folder, say yes.
05 Paste this
One message, and the kit takes over.
Copy this into the chat and send it. You do not need to change anything in it.
I have the Directive Video Kit in this folder. Read AGENTS.md and begin with the start skill.
The first thing it does is fetch the parts the video engine needs, which takes a few minutes and only happens once. Then it checks your machine and reports back in a short list of ticks and fixes.
It will ask you two questions. One is whether you have made a screen recording or edited a video before, which changes how much gets explained and nothing else. The other is what the video is for and where it will be seen, which decides the shape it makes.
If you took Path B and have an empty folder plus a repository address, add a second line to the message: First clone https://github.com/yourname/your-repo into this folder.
That is the setting-up finished. You can stop here and come back when you have a couple of hours.
06 What you will see
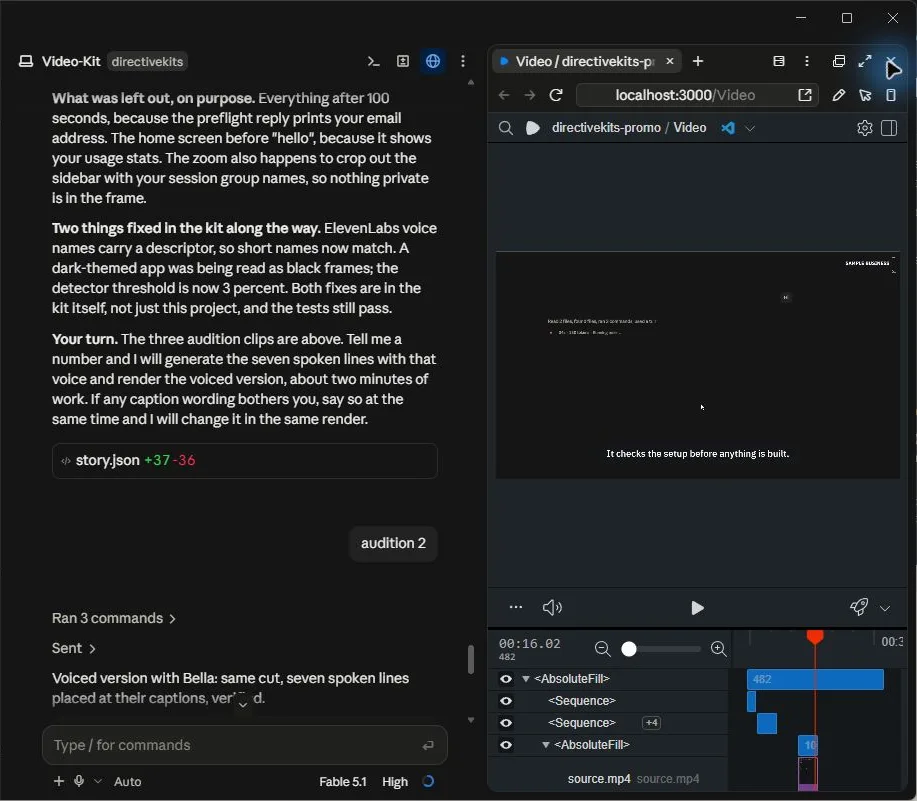
Chat on the left. The timeline on the right.
Once there are scenes to look at, your assistant opens the video studio beside the conversation. You can scrub the timeline and watch the cut before anything is rendered, and it can see the same thing you can.
Before that, you look at contact sheets
A recording is judged from a contact sheet: one tile per few seconds of footage, laid out as a grid. It is how you both check that every moment of the journey was captured and that nothing private is on screen. Your assistant reads the same sheet you do.
PROGRESS.md is where it keeps its place
A plain file in your folder that records which step you are on, which kind of video you chose, what has been decided and what is still open. You can close the laptop at any point, come back days later, say hello, and be told exactly where you stopped. Every version you render is listed there too.
Using Codex instead?
The same studio opens in the ChatGPT desktop app's own browser. Your assistant starts it and opens the address itself rather than reading it from a file in the kit. If you are working in a terminal window instead of either desktop app, there is no pane: your assistant will talk you through your own browser, and ask you to play the file and read the captions back.
07 What happens next
Seven steps, and you can stop after any of them.
About two to three hours in total, most of it spent deciding what to show rather than waiting for a computer. The times are estimates.
Step 1 · about 15 minutes
Start
It works out which assistant it is, whether it can see a browser, and whether Node and FFmpeg are installed and findable. It asks how familiar you are with video, and what the video is for, and suggests one of the eight recipes from your answer, such as a demo, a walkthrough, a release note or a cut for a feed. A recipe is advice: its size and length are where it starts, and you can take it anywhere.
Step 2 · about 30 minutes
Brief
An interview: who the video is for, the one journey it shows, and what it may and may not claim. You also approve a short truth file listing what is live, what is staged, what is generated or drawn, and what is only planned. It is advised for every recipe and needed whenever a clip is generated or stock. Everything after this is checked against that file, which is what stops a video saying more than the product does.
Step 3 · about 30 minutes
Footage
You record your screen calmly and at length, and the kit tidies the recording up. If your product is a web app, the kit can drive it and record it for you instead. Then you both go through the contact sheet, tile by tile, checking coverage and checking that no real name, address or notification is on screen.
Step 4 · about 30 minutes
Story
Which moments make the cut, in what order, and what each caption says. Captions are written for someone watching on a phone with the sound off. If you want a voice, this is where you record your lines or generate them, one file per line, placed at its exact moment.
Step 5 · about 20 minutes
Render
The video is made, checked and finished: an MP4 with a branded opening and close, or your own, captions burned in, and a stack of files beside it proving what is in it. Any other shape or file you ask for, from a square cut to ProRes, is made from the same project and checked too. The first render also downloads the small browser that draws the frames, so it is the slowest one you will do.
Step 6 · about 15 minutes
Review
You watch it. Your assistant reads the stills against the brief and the truth file, checks the captions at phone size, and fixes what it finds. Nothing is published for you; the kit ends at a finished file on your laptop, and putting it anywhere is you, after you have watched it.
Step 7 · about 10 minutes, then whenever you like
Update
You make one change straight away, while it is fresh, and render again. This is the loop that matters: when the product changes you open this folder and say what is different, and when you need a vertical cut for a feed you get one from the same recording without filming anything twice. Every earlier version stays where it was.
If you get stuck
Something not going to plan?
Tell your assistant what is on the screen first. It can talk you through most of it, and it has a help skill of its own for the rest.